Ice Cream Cups
 
Ice Cream Cups // Kenkō Kitchen. Photography by Elisa Watson, styling by Kate Bradley (Kenkō Kitchen).

Ice Cream Cups // Kenkō Kitchen. Photography by Elisa Watson, styling by Kate Bradley (Kenkō Kitchen).

Coconut Ice Cream

Vegan, Dairy Free, Refined Sugar Free, Gluten Free

Serves 4-6
Prep time: 10 minutes, plus 15 minutes freezing time

Ingredients

2 x 400g tin coconut cream
1 tbs maple syrup
1 tsp vanilla extract
½ cup rice malt syrup
pinch salt
4 passionfruits, pulp only
1 punnet strawberries, roughly chopped
½ mango, diced

For the raspberry variation
+ 2 tbs freeze dried raspberry powder

For the charcoal variation
+ 2 tsp activated charcoal

Method

  1. Combine all base ingredients in a bowl and gently whisk until combined. Fold through fruit and add in desired flavor variation if desired.
  2. Pour ice cream mixture into an ice cream maker and allow to freeze for 15 minutes.*
  3. Store in the freezer in a freezer safe container until ready to serve. Scoop into individual vessels or ice cream cones before serving.

*If you do not have an ice cream maker, simply pour mixture into a container and freeze for 3-4 hours, stirring or whisking the mixture every 30 minutes.

 
French Toast Waffles with Berry Compote

It’s safe to say this is one of my favourite breakfasts – ever. Not only is this recipe super easy to make, it is so delicious, wholesome and you will be filled up for hours. No more super-rich stodgy French toast, leaving you feeling like a slug. This healthy version is light, fresh and will have your tummy feeling nourished and happy!


French Toast Waffles with Berry Compote

Serves 4
Prep time: 5 minutes
Cooking time: 40 minutes

Ingredients

Waffles

130 g (4 ½ oz/1 cup) buckwheat flour
1 teaspoon baking powder
1 tablespoon stevia
250 ml (8. fl oz/1 cup) plant-based milk
60 ml (2 fl oz/ ¼ cup) maple syrup

French toast mix

400 ml (13. fl oz) tin coconut cream
60 ml (2 fl oz/ ¼ cup) plant-based milk
60 ml (2 fl oz/ ¼ cup) maple syrup

Berry compote

155 g (5. oz/1 cup) mixed berries
3 teaspoons stevia

To serve

175 g (6 oz) Macadamia ‘ricotta’ cheese (see below)
1 lime (quartered)

Method

  1. For the waffles, combine the buckwheat flour, baking powder and stevia in a bowl. Whisk in the milk and maple syrup.
  2. Depending on the size of your waffle maker, place a quarter or an eighth of the mixture in the waffle iron. Cook until the outside is golden (around 3–5 minutes) and remove.
  3. For the French toast mix, in a bowl combine the coconut cream, milk and maple syrup. Mix until combined.
  4. Heat a medium frying pan over high heat until hot. Dunk each waffle into the French toast mix and then place in the pan, cooking the waffles one at a time, until golden on the outside.
  5. For the compote, combine the berries, 60 ml (2 fl oz/ ¼ cup) water and the stevia in a saucepan over medium heat and let simmer until the liquid reduces and begins to thicken.
  6. To serve, place 1–2 waffles on each plate, top with the berry compote and 1 tablespoon of the macadamia ‘ricotta’. Serve immediately with a lime wedge on each plate.


Macadamia ‘ricotta’ cheese

Makes about 250 g (9 oz/1 cup)
Prep time: 10 minutes, plus soaking time for nuts

Ingredients

320 g (11. oz/2 cups) raw macadamia nuts, soaked in water overnight, drained
2 tablespoons coconut oil
Juice of 1 lemon
1 teaspoon salt
1 teaspoon savoury yeast flakes

Method

  1. Place the macadamia nuts in a food processor with the coconut oil, 2 tablespoons water and the lemon juice and blitz until smooth.
  2. Add the salt and savoury yeast flakes. Keep blending until the cheese is as smooth as you like.
  3. Store it in a container in the refrigerator for up to 1 week.
waffles
Bamya (Okra Stew)
Bamya (Turkish Okra Stew). Photography by Elisa Watson, Styling by Kate Bradley & Elisa Watson. Kitchen Cloth in Washed Waffle Grey from Fog Linen. Bowl, fork and glass found in an op shop. // Kenkō Kitchen

Bamya (Turkish Okra Stew). Photography by Elisa Watson, Styling by Kate Bradley & Elisa Watson. Kitchen Cloth in Washed Waffle Grey from Fog Linen. Bowl, fork and glass found in an op shop. // Kenkō Kitchen

We are currently in the midst of winter in Australia and to celebrate I thought I would share one of my favourite comforting recipes. This recipe hails from Turkey and is another recipe I have inherited from my boyfriends wonderful family. It is a dish in which you can serve hot or cold so you can make a big batch and have it for days on end (Turkish style), or you can pop any leftovers in the freezer for an easy meal. You can have it in a bowl on it's own or as a side with other Turkish dishes (like mücver - Turkish zucchini and dill fritters). It truly is delicious and is the perfect balance of comfort and nourishing. 

Bamya or Okra is a vegetable which is most often found in middle eastern stews and Indian, Sri Lankan curries. Okra is known for being quite a low calorie vegetable and it is a rich source if dietary fibre as well as containing many minerals and vitamins (such as vitamin A, C, K and B-6). It's absolutely delicious when cooked right and can be found to purchase fresh in Asian groceries and can be found frozen in Indian supermarkets. You could use either fresh or frozen for this dish, it really depends on what you can get your hands on!

Like many Turkish recipes this one is incredibly simple and easy to make. When both Yaprak and Suna (my boyfriends aunty and grandma) made this dish for me my heart just sang. It is such a delicious dish which you can just easily keep going back for more. It's a very common dish in Turkey and is definitely worth trying at home.

Happy cooking! xx


Serves 5
Prep time: 10 minutes
Cooking time: 45 minutes

Ingredients
1 lemon juice
500g okra
2 onions (diced)
3 tbsp rice bran or olive oil
3 garlic cloves
1 green capsicum (diced)
4 large tomatoes (diced)
1 tsp salt
1 400g tin chickpeas
1/2 tsp black pepper

Method
Peel the tips of the okra, wash and set aside. Place over the juice of 1 lemon and place into a fry pan with the diced onion and oil. Cook for 5-10 minutes or until onions begin to go translucent in colour. Slice and add in the garlic cloves, the diced capsicum and tomatoes. Add in the salt and then bring to the boil. Lower the heat and allow to simmer. Add in the chickpeas and cook until okra and tomatoes have completely softened.

Add in the pepper right before serving and enjoy hot!

It is that simple!

Rainbow Juice Trio
Photography by Elisa Watson.

Photography by Elisa Watson.

In Melbourne it was like a switch turned from beautiful sunny weather to blustery, rainy and freezing cold winter weather. Those of you down under will know that Melbourne has notoriously bad winters where it is far from being a beautiful snowy wonderland like Europe and North America but instead we more so get rain sleeting in your face thanks to high gust winds. This year it took no time for so many of my friends, family, colleagues and even myself to come down with a nasty flu or cold. As soon as you hear the sniffles happening in the office or see those watery eyes appear you just know you're in the danger zone! To help give my body some extra quick nutrients I pulled out the juicer and started throwing in one-two juices per day alongside my normal meals. 

Today I thought I would share a few of my new favourite juice recipes which have been getting a workout in my kitchen which I hope you will enjoy making in yours too!


Spicey Green Juice

Serves: 2 | Prep time: 5 minutes 

Ingredients
1 green apple
1 green chilli
4 kale leaves
2 sticks celery
1 lemon
1 cucumber
1/4 iceberg lettuce
handful mint

Method
Chop all ingredients and feed through your juicer. Pour into glasses over ice and enjoy!


Orange inflammation fighting juice

Serves: 2 | Prep time: 5 minutes 

Ingredients
3 carrots
3 oranges
1/4 pineapple
1 finger turmeric
2" piece fresh ginger

Method
Chop all ingredients and feed through your juicer. Pour into glasses over ice and enjoy!


Purple roots juice

Serves: 2 | Prep time: 5 minutes 

Ingredients
2 carrots
1 beetroot
4 red cabbage leaves
1 lemon
1 green apple
1 cucumber
1" piece fresh ginger

Method
Chop all ingredients and feed through your juicer. Pour into glasses over ice and enjoy!

GF Spinach Gnocchi with Basil Pesto
Spinach Gnocchi with Basil Pesto // Kenkō Kitchen. Image taken from the Kenkō Kitchen Cookbook. Cookbook out now through Hardie Grant/Rizzoli. Photography by Elisa Watson, styling by Kate Bradley (Kenkō Kitchen) and Sally Bradley.

Spinach Gnocchi with Basil Pesto // Kenkō Kitchen. Image taken from the Kenkō Kitchen Cookbook. Cookbook out now through Hardie Grant/Rizzoli. Photography by Elisa Watson, styling by Kate Bradley (Kenkō Kitchen) and Sally Bradley.

Last week the team at I Quit Sugar were ever so kind as to feature three of the Italian recipes from my Kenkō Kitchen Cookbook on their website. It was such a thrill to be featured on a website which was one of the first tools I utilised when I myself was giving up refined sugars. You can find the full post on the IQS website here.

When I first learnt to cook Italian food was one of the cuisines I wanted to master the most. I would recreate my grandmothers Spaghetti Bolognaise - whilst not very traditional in it's ingredients, it definitely was traditional country Australian bolognaise! Then I moved on to changing this up to be lentil bolognaise adapting it to include more vegetables and different herbs. I would try and make different lasagnes, I would make pestos of different flavours, gourmet pizzas and kept challenging myself with the basics. Whilst these might seem pretty simple for most, for a 13-14 year old I was pretty impressed with myself!

Italian food has always had such a huge influence on my cooking style and when I first gave up gluten it was one of the first things I feared. I loved Italian food! How could I go without it!? Luckily in todays day and age we have so many amazing gluten free options available. Especially in Australia, USA and the UK. I know that Europe is also very strong in its gluten free products with a lot being imported into Australia. But for those who prefer to make it from scratch I share with you today the recipe for my very simple gluten free Spinach Gnocchi with Basil Pesto taken from the Kenkō Kitchen Cookbook. You can substitute the buckwheat flour for all-purpose gluten free flour, you can substitute the potatoes for sweet potato and you can add in extra nuts into the pesto as desired (my favourite nut in pesto is almond!). 

I hope you enjoy this recipe. Please have a go and see how easy it is to make delicious light gnocchi at home!


Spinach Gnocchi 

Serves: 5 | Prep time: 10 minutes, plus drying | Cooking time: 30 minutes

Ingredients
2 kg potatoes, peeled and chopped
2 cups baby spinach or chopped english spinach
1 teaspoon salt
2 cups buckwheat flour 

Method
To make the gnocchi, start by steaming
the potatoes until soft, around 15 minutes. Transfer them to a bowl with the spinach and mash until smooth. Add the salt and flour and, using your hands, gently work the mixture to make a dough.

Sprinkle a work surface with flour and roll the dough into 2.5 × 1 cm (1 × 1⁄2 in) cylinders and chop into 2.5 cm (1 in) pieces. Gently flatten the top of each gnocchi with a fork and set aside to dry for about 20 minutes.

For the pesto, combine all the ingredients in a food processor or blender and blitz until smooth but still chunky (or to your desired pesto consistency).

To cook the gnocchi, place them in boiling hot water and when they rise to the top, remove them.

Basil pesto

Serves: 5 | Prep time: 5 minutes 

Ingredients

2 cups fresh green basil
olive oil
2 garlic cloves
zest of 1 lemon
1/4 cup pine nuts
2 tablespoons cashews
1/4 cup almonds

Method

Place all the ingredients with enough olive oil to make into a paste in a food processor or blender and blitz until smooth but still chunky (or to your desired pesto consistency).

TO SERVE simply toss the gnocchi in the pesto and serve with micro basil leaves on top.

Spinach Gnocchi with Basil Pesto // Kenkō Kitchen. Image taken from the Kenkō Kitchen Cookbook. Cookbook out now through Hardie Grant/Rizzoli. Photography by Elisa Watson, styling by Kate Bradley (Kenkō Kitchen) and Sally Bradley.

Spinach Gnocchi with Basil Pesto // Kenkō Kitchen. Image taken from the Kenkō Kitchen Cookbook. Cookbook out now through Hardie Grant/Rizzoli. Photography by Elisa Watson, styling by Kate Bradley (Kenkō Kitchen) and Sally Bradley.

Healthy Easter Recipe Favourites

I cannot believe Easter weekend is already upon us when it feels like New Years was just yesterday. This year seems to be flying past at a rapid rate! Today I present you with a collection of recipes I featured on the Kenkō website throughout last year to help keep your Easter weekend as delicious as possible! It can be hard seeing everyone biting into fluffy hot cross buns and delicious Easter chocolate treats when you're coeliac, living with intolerances and allergies or trying to eat healthy. For me, now being coeliac and lactose intolerant, I know that it is particularly hard as I can't even sneak a gluten treat as I will just get sick! Here below are some of my favourite chocolate recipes I know I will be creating this weekend to help keep me from FOMO (fear of missing out). From Hot Cross Buns, Raw Ganache Cakes, Ice Creams to Bliss Balls I hope you find a little something among this list to make this weekend special! 

I wish everyone has a safe holiday weekend filled with family, friends and chocolate! Make sure you take a moment for yourself to rest, relax and enjoy yourself! xx
 

hotxbuns

The first recipe, which is one of my absolute favourites to make all throughout the year is my Rosemary & Chocolate Hot Cross Buns. These are gluten free, refined sugar free and are totally beautiful. Cut them in half, pop them in the grill and put on a smear of coconut oil and you have yourself one insanely delicious treat!

Find the recipe here...

chocganache

A delicious Raw Chocolate Ganache Cake is something that is hard to go past - especially if you have guests coming over this weekend! The perfect chocolate indulgence which tastes just as good as it looks...

Find the recipe here...

icecreams

These Double Chocolate Ice Cream Sandwiches are the best chocolate treat to create as a delicious Easter dessert. Not only are they fuss free to make but they are also an absolute winner to serve up! Keep any leftovers in the freezer as a little go-to treat when you're craving that little bit of chocolate!

Find the recipe here...

If you're more of a Chocolate Coated Popsicle fan than a Ice Cream Sandwich Fan then this is the recipe for you. To make these a double chocolate treat simply add in some extra cacao into the ice cream mix and you have yourself a delicious double chocolate ice cream!

Find the recipe here...

Not only are these bliss balls super quick to whip up, but they are also very easy to mould into any shape you please. If you want something to replace the Easter eggs try whipping up a batch of these. Simply use an easter egg mould to shape them or even shape them by hand into little egg-like shapes. For an extra chocolate hit try melting some of your favourite raw chocolate and dipping these balls in. Simply then pop them into the freezer and wah-lah within minutes you will have set little very healthy easter eggs!

Find the recipe here...

burgers

The next recipe I share with you is the recipe for my Sweet Potato Rosti Garden Sliders which are tiny little mushroom burger gems with a delicious sweet potato rosti. You can play around with what you fill these with, you can put in some micro greens, herbs and let's face it any salad vegetables or sauce you're feeling like. For me I love these with the red onion relish and a little bit of greenery! This is a little savoury treat as let's face it after all the chocolate recipes above, your body will be feeling like something savoury to balance that out!

Find the recipe here...

All photography above by Elisa Watson for Kenkō Kitchen. Styling by Kate Bradley (Kenkō Kitchen) and Sally Bradley.

Coeliac Awareness Week Part 2 - Rainbow Thai Stir Fry
Rainbow Thai Stir Fry  // Kenkō Kitchen. Image taken from the Kenkō Kitchen Cookbook. Australian edition out now through Hardie Grant, out March/April through Hardie Grant UK and Rizzoli USA. Photography by Elisa Watson, styling …

Rainbow Thai Stir Fry  // Kenkō Kitchen. Image taken from the Kenkō Kitchen Cookbook. Australian edition out now through Hardie Grant, out March/April through Hardie Grant UK and Rizzoli USA. Photography by Elisa Watson, styling by Kate Bradley (Kenkō Kitchen) and Sally Bradley.

As a part of Coeliac Awareness Week I am posting two of my favourite recipes from the Kenkō Kitchen Cookbook. On Wednesday I posted the recipe for my Homemade Pizzas alongside the story of how I came to be diagnosed with Coeliac and some resources. Like all recipes from the cookbook the recipe I am sharing with you today, and the Homemade Pizzas I posted on Wednesday are completely gluten free, vegan and refined sugar free. 

After being diagnosed with Coeliac disease this January I have had to become very strict with my  eating, ensuring that everything I eat is completely gluten free! My mum and I went through the kitchen and collected everything that contained gluten - if you do have Coeliac it's important to read the labels of packaged foods as gluten can be hidden in everything and anything! I took all this food - flours, pastas, sauces, seasonings and packaged foods to my partners house for himself and his dad to eat (no wastage here!). Whilst I felt comfortable cooking at home for myself I was very scared with eating out! I knew there were some places I could eat but it was still an overwhelming feeling knowing when and if I went out with friends I would have to be very careful. 

I quickly got over this and started to go out for meals, life is too short to be scared! I soon found that a lot of restaurants are incredibly accommodating for those who need gluten free, and I have found even when there aren't things on the menu I have been able to ask and have something specially made. It's important to speak to the waiters to let them know you are coeliac so they can pass it onto the chefs! I'm not going to lie, there have already had a few instances where I have eaten out and I have been able to tell something has slipped into my food, causing me to have migraines and intense nausea later that night and the following day. Whilst this has been annoying, I know it is something which is going to happen and I just have to be prepared on how to deal with it when it happens! Which brings me to todays topic of how I manage when eating out with Coeliac and some tips if a slip up happens!

Some measures which I have already gotten into the habit of doing after having a meal are:

  • Having a drink of water with 1 tsp Bentonite Clay and 1 tsp of Activated Charcoal. This is said to help bind toxins and reduce gas and bloating. 
  • I ensure I have a lot of water (especially if I am having the clay/charcoal drink!) and add in 2 tsp Apple Cider Vinegar into a glass of water to also help with my digestion.
  • It is also recommended for people with Coeliac to carry around Digestive Enzymes (you can pick these up from your local health food store - they are normally in the fridge section with the probiotics) in your bag to have with your meal - it's all about getting that food through! 
  • Ginger and turmeric are also great to add into water as they are both anti-inflammatories which is essential to heal your gut. 
  • Kombucha, probiotic tablets and kefirs are also wonders to bring in that good bacteria back to your stomach. 
  • Aside from this, allowing yourself to rest is also very important as your body needs to recover and heal!

These are just some options which have helped me, but I would also love to hear what tips and tricks other Coeliacs use to help them feel better after being glutened! These little remedies will be different for every person, so like I say for everything, it's important to listen to your own body and see what works for you!!

We are lucky that we do live in an age where gluten free food is becoming more available and we have access to some amazing gluten free recipes to make sticking to a gluten free diet incredibly easy! If you think you may have Coeliac check out my first post for Coeliac Awareness Week here which has resources and links for more information on symptoms, how to get tested and what happens next!


This is another recipe from the Kenkō Kitchen Cookbook for my Rainbow Thai Stir Fry. If I am ever tired and don’t know what to make when I come home from work, this is usually what I end up cooking. It’s mind-numbingly easy. It’s also so colourful that it will turn any miserable day into a happy one, and there will be no need to call the local Thai takeaway ever again. I cannot over-emphasise the vibrant flavours in this dish – think pad Thai, but so, so, so much better!

Serves 4
Prep time: 10 mins
Cooking time: 10 mins

INGREDIENTS

SAUCE

1 tablespoon tamarind paste
2 tablespoons coconut sugar
1 kaffir lime leaf
1 lemongrass stem
2 garlic cloves
5 cm piece fresh ginger
1 tablespoon tamari
1 lime, juiced
2 tablespoons sesame oil
2 tablespoons almond oil or coconut oil

STIR-FRY

1/2 red onion, diced
1 carrot, julienned
1/8 purple cabbage, thinly sliced
2 red chillies, sliced
100g whole oyster mushrooms
or 100g shiitake mushrooms, sliced
50g enoki mushrooms
1 teaspoon ground kelp
125g flat brown rice noodles
1 bunch broccolini, stalks cut into thirds

GARNISH

1/2 bunch coriander leaves, chopped
2 limes, quartered
40g peanuts, crushed
2 spring onions, chopped

METHOD

Place all the sauce ingredients in a food processor or blender and blitz until smooth. Set aside.

Heat a wok or large frying pan over medium heat and add the sauce and onion. Cook for 2–3 minutes then add the carrot, cabbage, chillies, mushrooms and kelp and cook for 5 minutes.

Meanwhile cook the noodles for 5 minutes in a pan of boiling water. Remove from the heat, drain and run under cool water.

Add the broccolini to the wok along with the noodles and cook for a further 2 minutes.

Serve in bowls and top with coriander, lime wedges, the peanuts and spring onions.

Enjoy!

Coeliac Awareness Week & Homemade Gluten Free Vegan Pizzas
Homemade Pizzas  // Kenkō Kitchen. Image taken from the Kenkō Kitchen Cookbook. Australian edition out now through Hardie Grant, out March/April through Hardie Grant UK and Rizzoli USA. Photography by Elisa Watson, styling b…

Homemade Pizzas  // Kenkō Kitchen. Image taken from the Kenkō Kitchen Cookbook. Australian edition out now through Hardie Grant, out March/April through Hardie Grant UK and Rizzoli USA. Photography by Elisa Watson, styling by Kate Bradley (Kenkō Kitchen) and Sally Bradley.

It's currently Coeliac Awareness Week in Australia and this is a topic which is now very close to my heart. About 4 or 5 years ago I was first tested for Coeliac Disease after I had been experiencing intense daily migraines, chronic tiredness, depression, nausea, constant gastrointestinal issues, I would bruise super easily and kept gaining weight no matter what I tried. It was easy to say that I didn't feel my age, and certainly didn't feel at my healthiest or fittest like I should have been. In my last few years of high school I had tried everything. I tried every diet, would exercise daily, would go to the gym, at one stage I was running 10km every day and would just try anything I could to try and be healthy and fit like the other girls at my school. Instead of looking like the girls at school I looked the opposite, I was as pale as a ghost (always aneamic), overweight, tired and just felt horrible! After my GP referred me to the gastroenterologist specialist I was immediately booked in to get tested for Coeliac but after having a colonoscopy their results were inconclusive. I was told I could have possibly been lactose and fructose intolerant but it didn't look like I had coeliac. 

Years went on and despite my diet and exercise regime getting better and better I was still feeling lethargic, getting migraines and couldn't shift my weight. Even when I first started this blog, although I had stopped eating gluten as much as I could, I was still unaware of my coeliac and was under the impression I didn't have it, so I still had it every now and then, and I wouldn't be phased if I thought something would be contaminated by gluten.

It wasn't until after I returned from my recent trip to Japan that I got extremely sick. My last few days in Japan were spent with my boyfriend propping me up as we (tried) walking around, sitting on any bench we could find as I couldn't see through my migraine and dizziness and I was suffering extreme nausea. It was the sickest I had been and felt in a long, long time and it didn't add up! After two days of being home in Melbourne I was taken to hospital as my migraines had not dispersed, I was vomiting everything and anything that was in me, had bowel issues and was suffering extreme tiredness and dizziness. We thought I must have picked up some sort of bug in my travels and thought I would be out of hospital in a night, maximum two but instead found myself getting sicker and in the end was in hospital for a full week.

I was lucky that because of my stomach issues the doctor looking after me in the hospital was a gastroenterologist and he was by far the best doctor I have ever encountered. He ordered a CT scan on my brain for the migraines I had been suffering since high school which had become worse and worse, they did blood tests, ultrasounds and in the end after finding nothing conclusive did a colonoscopy and biopsy. A week after being released from hospital I went to see the gastroenterologist who confirmed that I did in fact have coeliac disease which had depleted my immune system and had caused me to be very sick! 

My doctor asked me if I had any experience with gluten free eating to which I said "my first cookbook is actually just about to be released!" and I felt so lucky that I had made this gluten free cookbook, unknowingly that I was actually coeliac when writing it! I just wanted to create a book that would be accessible to as many people as possible showing them they did have options which were healthy and still delicious that could fit in with their diet and lifestyle choices. I didn't think I would be writing a book that would in turn get used daily in my own household out of necessity!

In Australia the figure currently stands that around 1 in 70 people have Coeliac disease, and out of these only 1 in 5 are actually diagnosed. Leaving the others undiagnosed and suffering! Coeliac is a disease in which the immune system reacts abnormally to gluten (a protein found in wheat, rye, barley and oats) causing small bowel damage. This results in the bowel becoming inflamed and leads to malabsorption of nutrients. The symptoms of Coeliac vary from headaches and migraines, gastrointestinal issues, fatigue, iron deficiency, bone and joint pains, mouth ulcers, altered mental alertness, skin rashes, easy bruising of the skin, unexplained weight loss or weight gain. By sticking to a strict gluten free diet you can lead to small bowel healing and reduces the risk of the long term complications such as  auto immune diseases, infertility, liver disease, early onset osteoporosis and more. 

Getting tested for Coeliac now is easy, but it is crucial that you get tested if you do think you have Coeliac. Coeliac is a serious disease with lifelong implications so the earlier you can get onto it, the better! If you think you could have Coeliac go and see your regular GP. They can arrange a gene test and blood test but the best option is to get them to refer you to a gastroenterologist specialist you can organise a colonoscopy and small bowel biopsy. The only downside of getting tested is that you have to eat gluten regularly for at least 6 weeks prior to the testing (at least 4 slices of bread for adults and 2 for children), otherwise the results will be unclear and inconclusive. For those already following a gluten free diet this may be a challenge (it is said there are over half a million Australians currently sticking to a gluten free diet) but it is worth it to get the definitive results before you completely cut it out! Although the removal of gluten and wheat products from your diet may make you feel better, it doesn't necessarily mean that you are Coeliac - you may just have a Non-Coeliac Sensitivity so it is definitely worth getting tested!! 

Lucky being Coeliac in Australia, the UK and USA now days is quite easy. Most restaurants and cafes provide gluten free options (just be sure to let them know you do have Coeliac before you order) and the range of gluten free products are taking over supermarket shelves. There are many cookbooks and online resources for gluten free cooking making it easy to enjoy all your favourite foods at home. My cookbook, the Kenkō Kitchen Cookbook is completely gluten free with over 93 recipes to keep your tummy happy and healthy and it is now available from all good bookstores and department stores across Australia as well as online across the USA and will be released this April in the UK.

I will do another post on Friday for Coeliac Awareness Week, so if you have any queries or questions or suggestions send them through! 

Here are a list of very helpful resources and links to read up more information on Coeliac disease:

Coeliac Australia -  http://www.coeliac.org.au
Gastroenterologist Society of Australia - http://www.gesa.org.au/consumer.asp?id=45
Bupa - https://www.bupa.com.au/health-and-wellness/health-information/az-health-information/coeliac-disease
Shepherd Works - http://shepherdworks.com.au/disease-information/coeliac-disease
Better Health - http://www.betterhealth.vic.gov.au/bhcv2/bhcarticles.nsf/pages/coeliac_disease_and_gluten_sensitivity
Celiac.com - http://www.celiac.com
Celiac Disease Foundation - http://celiac.org


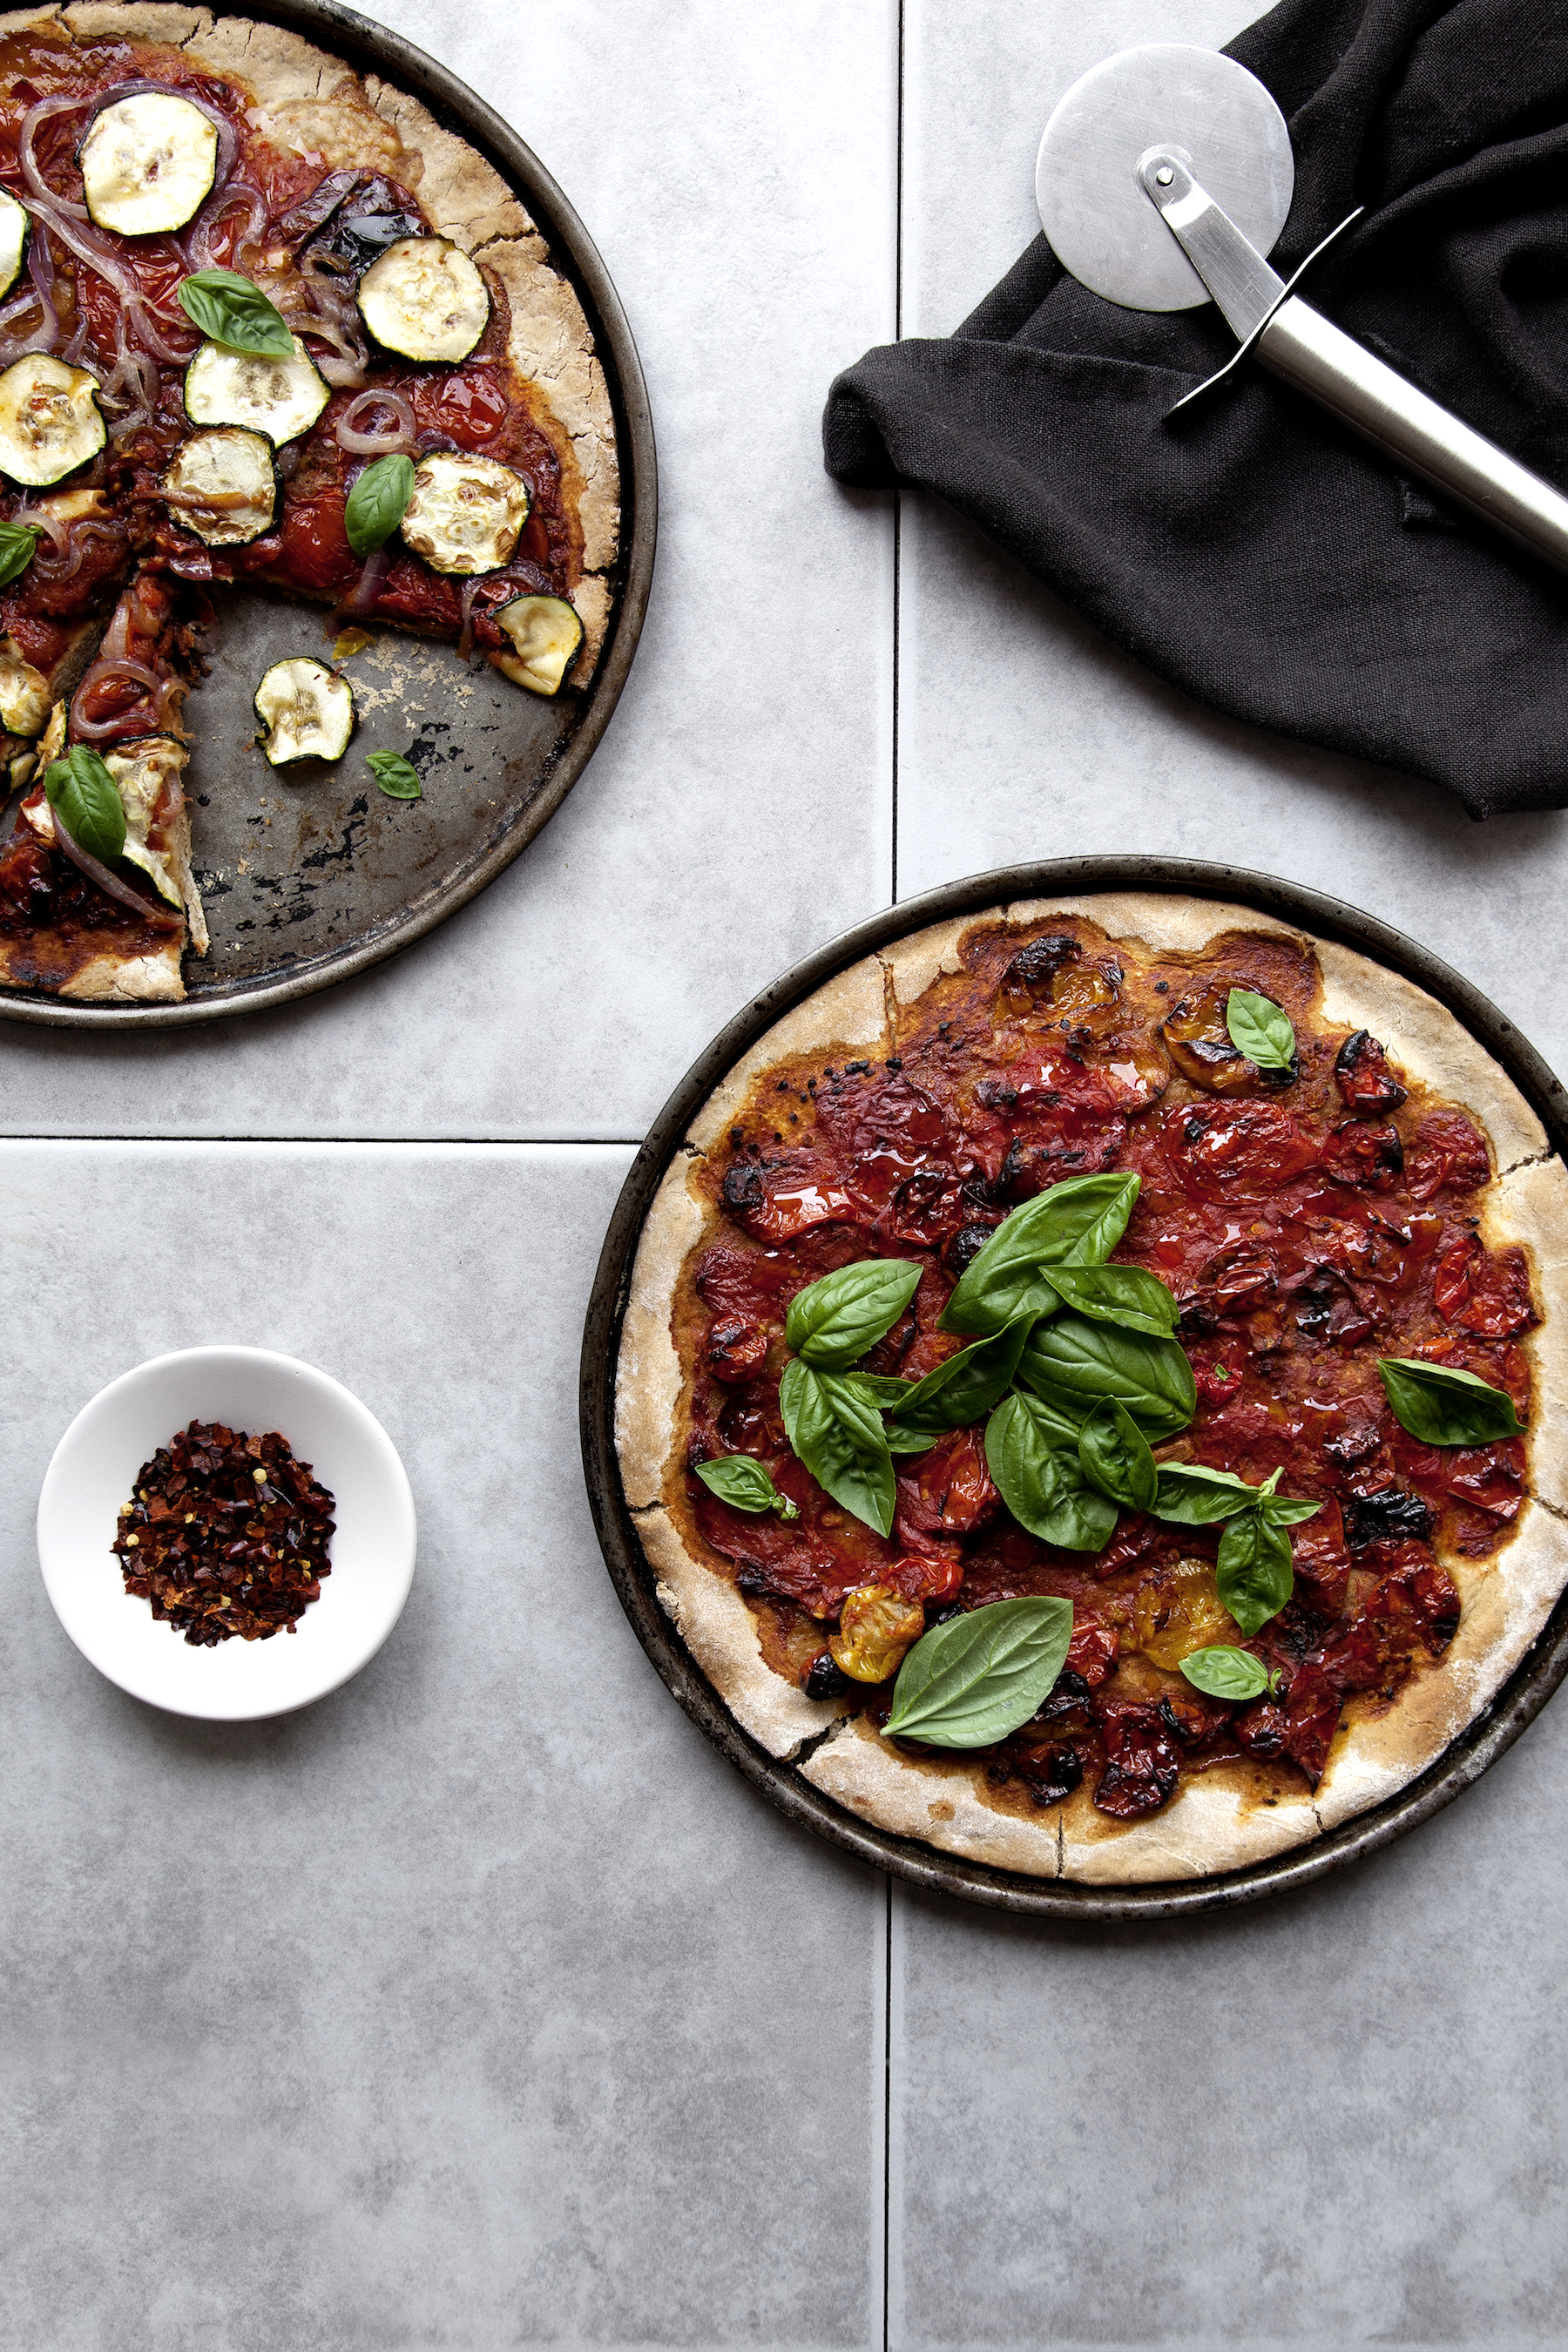
Now it's onto the food! To celebrate Coeliac Awareness Week I am providing one of my favourite gluten free recipes from my cookbook. Pizzas are a must in a person’s life – not greasy fat-laden pizzas, though! This recipe is for delicious and simple vegan pizzas. You can top them with more or less ingredients depending on what you fancy. The dough is easy to make and the whole thing is so flavoursome. This dish is sure to please the family!

Serves: 4
Prep time: 20 mins (plus rising time)
Cooking time: 40 mins

Ingredients

PIZZA DOUGH

260g buckwheat flour
200g brown rice flour
7g dry yeast
1 teaspoon salt
2 tablespoons coconut sugar
2 tablespoons plant-based oil

TOMATO SAUCE FOR BASE

375g cherry tomatoes
3 garlic cloves
2 tablespoons plant-based oil
1/2 teaspoon salt
1/4 teaspoonfreshly ground black pepper

TOPPING

75g cherry tomatoes, halved
1 zucchini, thinly sliced
1/4 teaspoon salt
1/4 teaspoon freshly ground black pepper
1/4 teaspoon ground kelp
1 red onion, chopped
1 teaspoon plant-based oil
2 tablespoons maple syrup
1 bunch basil leaves

YOU CAN ALSO ADD:

mushrooms, sliced
capsicum, sliced
artichoke hearts
cashew "goats" cheese

METHOD

To make the pizza dough, begin by combining the flours, yeast, salt and sugar in an electric mixer with the bread hook attachment. Add 250 ml water and the plant-based oil and mix until a nice smooth dough has formed.

Transfer the dough to a lightly floured work surface and gently knead for 5–10 minutes. Place in an oiled bowl in a warm place for 35–45 minutes or until risen.

Preheat the oven to 180°C.

While the dough is proving, make the tomato sauce. In a small oven dish place the tomatoes, garlic, oil and salt and pepper. Bake for 15–20 minutes until nice and roasted (see note). Remove and transfer the mixture to a food processor or blender and blitz into a sauce.

Knead the dough again, before pushing it into 2 flat bases on 2 baking or pizza trays. You can make the bases any shape you like – round, square or rectangular, it’s up to you! You do want to get the bases quite thin (about 5 mm) and, then, once in the desired shape, prick them with a fork to stop them from rising too much in the cooking process.

Bake the bases in the oven for 5–10 minutes then remove.

Spread the sauce onto the bases and top with the tomatoes, zucchini, salt, pepper and kelp. In a small frying pan, fry the onion in the oil and maple syrup for 5–10 minutes. Add this to the top of the pizza.

Cook for 15–20 minutes until the base and vegetables are nice and cooked. Remove from the oven, slice, top with fresh basil and enjoy!

NOTE:

When I have a lot of time, I prefer to slow-roast the vegetables for the sauce over a couple of hours. But when we are making a speedy pizza, the quick roast works fine!

Chocolate, Mocha & Coffee Layer Cake // Kenkō Kitchen. Image taken from the Kenkō Kitchen Cookbook. Australian edition out now through Hardie Grant, out March/April through Hardie Grant UK and Rizzoli USA. Photography by Elis…

Chocolate, Mocha & Coffee Layer Cake // Kenkō Kitchen. Image taken from the Kenkō Kitchen Cookbook. Australian edition out now through Hardie Grant, out March/April through Hardie Grant UK and Rizzoli USA. Photography by Elisa Watson, styling by Kate Bradley (Kenkō Kitchen) and Sally Bradley.

Chocolate Popsicles and Cookbook Release in USA!
Chocolate, Mocha & Coffee Layer Cake // Kenkō Kitchen. Image taken from the Kenkō Kitchen Cookbook. Australian edition out now through Hardie Grant, out March/April through Hardie Grant UK and Rizzoli USA. Photography by Elis…

Chocolate, Mocha & Coffee Layer Cake // Kenkō Kitchen. Image taken from the Kenkō Kitchen Cookbook. Australian edition out now through Hardie Grant, out March/April through Hardie Grant UK and Rizzoli USA. Photography by Elisa Watson, styling by Kate Bradley (Kenkō Kitchen) and Sally Bradley.

To celebrate the Kenkō Kitchen cookbook being officially released in the USA today (3rd March 2015) I am posting this recipe extracted from the cookbook of my Chocolate Popsicles. Like all recipes in the book these are sugar free, vegan and gluten free! A must make for all! These treats are absolutely perfect  mourn the end of summer in Australia this past weekend I am posting a delicious summer recipe taken from my new cookbook the Kenkō Kitchen cookbook. This recipe is easy to make, is a million times healthier than their milk bar counterpart and are truly delicious. This is great to make to have for a healthy summer treat after a day at the beach, to make for your kids or just make and keep in the freezer for when you need a little something sweet!

This recipe is taken from the Kenkō Kitchen Cookbook available now around Australia and is available in the USA as of the 3rd of March (this Tuesday!!). Don't worry UK it will be available their in April and is available for pre-order now!


Makes 4–6 (depending on size of moulds)
Prep time: 30 minutes, plus 40 minutes setting

Popsicle sticks
Ice cream
400 ml (13 ½ fl oz) coconut cream (refrigerated)
125 ml (4 fl oz/ ½ cup) maple syrup
155 g (5 ½ oz/1 cup) cashews (soaked in water overnight)
¼ teaspoon salt
seeds from ½ vanilla bean

Chocolate coating
80 ml (2 ½ fl oz/⅓ cup) coconut oil
30 g (1 oz/ ¼ cup) cacao powder*
2 tablespoons stevia*
¼ teaspoon sea salt
slivered almonds to garnish

Begin by placing all the ice cream ingredients in a blender and blitz until smooth and creamy. Remove and pour into an ice cream maker, letting it churn for 14 minutes until a beautiful ice cream has formed.

Scoop the ice cream into popsicle moulds, press in the popsicle sticks and place in the freezer for 30 minutes or until frozen.

Mix all the chocolate coating ingredients in a bowl. Remove the set popsicles from the moulds.

Working quickly, dip each ice cream in the chocolate coating – the chocolate will begin to set very quickly on the ice creams as soon as the coconut oil hits the cold ice cream.

Sprinkle the almonds on the chocolate before it has set and dunk the popsicle in the chocolate again to coat the almonds.

Return to the freezer until they are ready to eat!

The Ultimate Valentine's Day Cake
Chocolate, Mocha & Coffee Layer Cake // Kenkō Kitchen. Image taken from the Kenkō Kitchen Cookbook. Australian edition out now through Hardie Grant, out March/April through Hardie Grant UK and Rizzoli USA. Photography by Elis…

Chocolate, Mocha & Coffee Layer Cake // Kenkō Kitchen. Image taken from the Kenkō Kitchen Cookbook. Australian edition out now through Hardie Grant, out March/April through Hardie Grant UK and Rizzoli USA. Photography by Elisa Watson, styling by Kate Bradley (Kenkō Kitchen) and Sally Bradley.

Valentine's Day is fast approaching and whilst it's not something I traditionally celebrate - Let's just say it's a long story involving my 11 year old self dropping a love heart cushion with two teddys hugging on it and the words 'I love you' inscribed onto my "boyfriends" doorstep and never receiving a valentines back (and still never receiving any valentine of any sort to this date - young love tragedy, I know) - I do like to take the day as an opportunity and excuse to bake something decadent and beautiful.

This is three layer cake which I am sharing with you is from my new cookbook the 'Kenkō Kitchen' cookbook. It is a Chocolate, Mocha & Coffee Layer Cake with Chocolate Avocado Mousse filling and delicious vanilla coconut and chocolate icing.  The recipe was posted last week very kindly by Sportluxe but I thought I should also share it here for all my subscribers and followers who may have missed it. This cake is beautiful in not only taste and but also in appearance. It definitely has the wow factor and whilst it may look crafty to make up I assure you it is very easy to bake, assemble and is fool proof to ice! You can make this for your special partner to share on Saturday or otherwise you can make it simply for your family, friends or even more importantly - yourself. 

You can still purchase the Kenkō Kitchen cookbook for 30% off RRP from David Jones stores across Australia as it's still in the Top 10 books this week! Otherwise you will find the book in all good bookstores and department stores across the country and online. For more information check out the cookbook page here

Please enjoy this beautiful decadent cake and remember to enjoy yourself this weekend! xx


Chocolate, Mocha & Coffee Layer Cake

Serves 6
Prep time: 30 minutes
Cooking time: 30 minutes

Ingredients

Cake base
225 g (8 oz/1 ½ cups) light buckwheat flour
240 g (8½  oz/1½ cups) brown rice flour
100 g (3½ oz/1 cup) ground almonds or almond meal
2 teaspoons baking powder
1 teaspoon bicarbonate of soda (baking soda)
1 tablespoon cacao powder
1 tablespoon tapioca flour
1 teaspoon salt
105 g (3½ oz/½ cup) stevia or coconut sugar
125 ml (4 fl oz/½ cup) rice malt syrup
250 ml (8½ fl oz/1 cup) plant-based oil
190 ml (6½ fl oz/ ¾ cup) coconut oil
250 ml (8½ fl oz/1 cup) plant-based milk 
30 g (1 oz) flaxmeal
125 ml (4 fl oz/ ½ cup) water

Mocha layer
60 ml (2 fl oz/ ¼ cup) espresso or cold brew coffee
30 g (1 oz/ ¼ cup) cacao powder

Coffee layer
80 ml (2½ fl oz/⅓ cup) espresso or cold brew coffee
1 tablespoon stevia
1 tablespoon buckwheat flour
1 tablespoon brown rice flour

Chocolate layer
40 g (1½ oz/⅓ cup) cacao powder 

Filling
1 avocado, stoned
1 banana
30 g (1 oz/ ¼ cup) cacao powder
45 g (1½  oz) stevia (or more if you prefer sweeter)

Icing
350 g (12. Oz/2 cups) stevia icing mix (Sporteluxe tip: try Natvia Icing Mix to taste)
1 teaspoon vanilla extract
125 ml (4 fl oz/½ cup) coconut cream, plus a little extra if needed
30 g (1 oz/ ¼ cup) cacao powder

Method

  1. To make the cake base, mix all the ingredients in an electric mixer until combined. Divide the batter into 3 separate bowls.
  2. Preheat the oven to 180°C (350°F).
  3. For the mocha layer, mix the espresso and cacao into the mixture in one of the bowls. Then pour the mixture into a greased 18.5 cm (7 ¼ in) cake tin.
  4. For the coffee layer, mix the espresso, stevia, buckwheat flour and brown rice flour into the second bowl and then pour into another greased cake tin.
  5. For the chocolate layer, mix the cacao into the third bowl and pour into another cake tin. Bake the cakes in the oven for 30 minutes or until a skewer comes out clean. Alternatively, if you only have one cake tin, you just repeat the process 3 times until you have cooked each cake.
  6. Let the cakes cool completely then remove from the tins.
  7. To create the filling, mix the avocado, banana, cacao and stevia and beat with an electric mixer until light and fluffy.
  8. Place the coffee layer cake on a plate and spread the top with the avocado mousse filling. Next, top with the mocha cake, and spread over more mousse, and finally add the chocolate layer on top.
  9. To make the icing, mix all the ingredients, except the cacao, and beat with an electric mixer until combined. Halve the mixture and stir the cacao into one half. Spread the mixtures onto the cake, a little bit of each at a time (I use a cheese knife), swirling occasionally until the cake is fully coated. Place in the refrigerator until you’re ready to serve.
Chocolate, Mocha & Coffee Layer Cake // Kenkō Kitchen. Image taken from the Kenkō Kitchen Cookbook. Australian edition out now through Hardie Grant, out March/April through Hardie Grant UK and Rizzoli USA. Photography by Elis…

Chocolate, Mocha & Coffee Layer Cake // Kenkō Kitchen. Image taken from the Kenkō Kitchen Cookbook. Australian edition out now through Hardie Grant, out March/April through Hardie Grant UK and Rizzoli USA. Photography by Elisa Watson, styling by Kate Bradley (Kenkō Kitchen) and Sally Bradley.

KENKŌ KITCHEN COOKBOOK RELEASE
Coconut Ice Cream 6 Ways // Kenkō Kitchen. Image taken from the Kenkō Kitchen Cookbook. Australian edition out now through Hardie Grant, out March/April through Hardie Grant UK and Rizzoli USA. Photography by Elisa Watson, styling by Kate …

Coconut Ice Cream 6 Ways // Kenkō Kitchen. Image taken from the Kenkō Kitchen Cookbook. Australian edition out now through Hardie Grant, out March/April through Hardie Grant UK and Rizzoli USA. Photography by Elisa Watson, styling by Kate Bradley (Kenkō Kitchen) and Sally Bradley.

And so it is finally here, the Kenkō Kitchen cookbook has now officially hit stores across Australia. I am a mixture of both nervous and excited waiting to see everyones reactions to the book we worked so hard on. On the official day of the cookbooks release, Sunday February 1st, I went around to various bookstores with my parents (who were even more nervous than I was!). First we went to a shopping centre nearby to see if anyone had put it on the shelves (nobody had yet), and then went to Readings in St Kilda where they were already down to last two copies. It still hadn't sunk it yet that I was looking at my own book sitting next to Donna Hay and Jamie Oliver. We then went to check out another Readings where they had the book on display and then onto a David Jones store. This was when everything got a little too overwhelming. David Jones had it on display in four different spots! I went to buy a book and the lady asked me if the book was good, I said "I hope so as I made it!" and with that I completely burst into tears and the reality of the situation had sunk in. I made a book with my amazing photographer Elisa Watson and it was now on the shelves in stores. Something I had only dreamed of and never thought would ever become a reality.

I really cannot thank the team at Hardie Grant more for allowing me to create a book which I believe in so strongly. Although vegan, gluten free and refined sugar free recipes on their own are becoming more common in our society it is quite rare to find a recipe which accounts for all three. This is not to say only vegans, coeliacs or those with intolerances should or can buy my cookbook as it really was made for everyone. I tried to make a book which would be as inclusive as possible whilst remaining simple in it's methods and using easy to source ingredients. This accessibility factor is something I believe in very passionately and it is something we need to be more aware of. Not everyone can afford to do $300 grocery shops every week to feed their family and not everyone has the time to run from specialty shop to health food shop to track down niche expensive ingredients. For this reason in the Kenkō Kitchen cookbook I have used as many ingredients as I could which are easy to pick up from your local supermarket. 

The Kenkō Kitchen cookbook is a collection of not only my favourite recipes with a healthy twist but also includes raw, detoxifying and macrobiotic recipes. I have tried to make this first cookbook for newcomers to healthy eating or those with speciality diets as well as being something which I hope will continue to inspire the long-term health conscious food lovers, vegans and those living with intolerances and allergies. From nutritious breakfast options such as porridges, waffles, granola and homemade vegan yoghurts, to light-but-filling lunch options and delicious dinners you should be able to find that there is something in the cookbook for every occasion.

I made this cookbook with love and passion for you. I wanted to create something which would inspire other young people and adults to cook and eat healthy nourishing dishes at home with ease. I want to get people away from thinking healthy means only eating lettuce, diet yoghurt and celery sticks (it certainly isn't!!) and I want to stop people being fearful of food. We need to get back to eating real food made using beautiful ingredients and taste the love and nourishment in each dish.  I hope with this first cookbook I achieve this even if only on a small scale. 

Kenkō Kitchen Cookbook // All images taken from the Kenkō Kitchen Cookbook. Australian edition out now through Hardie Grant, out March/April through Hardie Grant UK and Rizzoli USA. Photography by Elisa Watson, styling by Kate Bradley (Kenkō Kitchen) and Sally Bradley.

I want to thank a few beautiful bloggers who have featured the Kenkō Kitchen cookbook on their websites and have posted recipes from the book in honour of it's release. You can check out an interview with myself and a recipe for that amazing caramel slice on Jessica Cox Nutritionist's website, the recipe for the Rainbow Stirfry on George Eats and the recipe for those amazing Sweet Potato Mushroom burgers on The Holistic Ingredient. Alongside this I would also like to thank the numerous publications who have featured the cookbook such as Inside Out and Nourish magazine as well as Yen for publishing a very kind review!

Thank you to everyone who has supported me in the making of this book and been a huge help in the process. The biggest of thanks to my mum and dad who allowed me to turn the kitchen and house upside down for months and for always being their to lend a helping hand. I still am yet to catch my breath from it all and really come to the reality of this whole thing (I swear it's still not real!). I cannot wait to see what is next. xx


THE HARDBACK COOKBOOK IS NOW AVAILABLE FOR order/pre-order THROUGH BOOK WORLDBOOK DEPOSITORYBOOKTOPIAAMAZON AND RANDOM HOUSE NZ.

RELEASED 1ST FEBRUARY 2015 IN AUSTRALIA AND THE UK, MARCH 3RD IN THE US, CANADA AND REST OF THE WORLD.

Lotus Root Chips with Matcha Salt
Photography by Elisa Watson. Styling by Kate Bradley (Kenkō Kitchen) & Elisa Watson.

Photography by Elisa Watson. Styling by Kate Bradley (Kenkō Kitchen) & Elisa Watson.

This recipe is inspired by something I had on a recent trip to Japan where we went to a 7 story restaurant that our local Tokyo friend had taken us to. The first thing he ordered from the menu which was written completely in Japanese (so lucky we had him there!) was this dish - fried lotus root chips with matcha salt. My mind, even when he said it, got completely blown, and when I actually tasted it I knew it was absolutely magnificent and something I just HAD to recreate for you guys. Lucky for me (and for you) this dish is super super simple and can be done in as little as 15 minutes! It is the perfect snack to have with drinks, to serve up for kids as a side replacement for chips and is just perfect as a gourmet nibble.

The other amazing thing about this dish is the pure amount of health benefits that the lotus root (and matcha) hold. Lotus root, which has long been used in Asian cooking is known for improving digestion, reducing cholesterol, lowering blood pressure, boosting the immune system, helps in preventing numerous forms of cancer, balances mood, can help in relieving depression and increases blood circulation. The lotus root has a potato like texture which makes it perfect in stews, soups, curries and of course for making chips! 

In other super exciting news it is now only two sleeps until the Australian release of my cookbook officially hits shelves in stores around the country! It is completely bizarre to think that I will be able to walk into a store and see my book sitting there and I swear it's still not real! I keep having to pinch myself! I am so excited and nervous to see what you all think of my first cookbook and I cannot wait to see what you cook up first! The cookbook will be available at all good retailers across Australia including Readings, David Jones, Angus & Robertson and in many other shops and cafes! If you're not able to pick up a copy in person you can however order the book from Book World, Book Depository, Booktopia, Amazon, Random House NZ or Angus & Robertson online to name a few! So excited!! 

Until then please enjoy this delicious recipe and don't forget you can stay updated on my Instagram or Facebook for more information on the cookbook! xx


Serves 2-4
Prep time: 5 minutes
Cooking time: 10-15 minutes

Ingredients
1-2 large lotus roots
2 tbsp coconut oil (plus a little extra if needed)
1 tbsp matcha powder
1/4 cup sea salt or pink salt flakes

Method
Cut your lotus root(s) into 1/2 cm thick pieces. Place into a fry pan with the coconut oil and fry for 5-10 minutes until golden on each side. Once golden, remove from heat to avoid burning and place onto some kitchen towel to remove any excess oil.

For the salt, simply mix the matcha powder into the salt flakes until combined.

Then it's time to dip the crunchy delicious lotus root chips into the green salt and enjoy immediately!